Installing the latest version

Now this is the fun part. I will try to describe this as clearly as I can. It’s not all that complicated once you know where to get your stuff (and your info). It is in this area that the invaluable help from mgrossman and mettler came in.
Att the time of writing this article we are building SDL Hyperion 4.2 (on a Raspberry Pi), assuming you are logged on to a command line terminal, as user pi. This means all directories created and referenced below are based on the path /home/pi/
Here we go.
Pre-requisites
First we need some stuff installed, like cmake and github.
Install cmake
NOTE: CMAKE is used later on in the process to build the external packages. If you need CMAKE, it is a simple APT sequence:
sudo apt-get install cmake
Install Github
Furthermore we ensure that we have access to Github, a ginormous open source source file repository. To get our access to Github we proceed as follows:
sudo apt-get install git
When this is done, we create our own git working directory and we go there:
cd ~
mkdir git
cd ~/git
There we are, you now have your own git workshop.
Prepare directories
We will make three directories, starting user pi base path, /home/pi/
Create directories
We will make the source directory, a target directory for binaries and a directory for the needed external packages:
cd ~
mkdir sdl42 herc42 extpkgs
Install sources
Install source for external packages
Let’s get the sources for the external packages first:
cd ~/extpkgs
git clone https://github.com/SDL-Hercules-390/gists
Now copy two files in gists to the extpkgs directory (note: we are still in the ~/extpkgs directory). Also, set the permissions so the sh files can be executed.
cp ./gists/extpkgs.sh .
cp ./gists/extpkgs.sh.ini .
sudo chmod 777 .
Specially for the Pi
For all Pi’s, before you build extpkgs edit the extpkgs.sh.ini file and set the target to arm. There’s a line that by default reads:
cpu = x86
Alter this line so it reads instead:
cpu = arm
Edit the extpkgs.sh.ini file to set the cpu type to ‘arm’, and save your changes (ctl-O then ctl-X).
nano extpkgs.sh.ini
After saving the .ini file we are ready to build the external packages. This will run for 3-4 minutes.
./extpkgs.sh clone c d s t
Done! We have now built the external packages that Hyperion needs. Make a note of where these external packages are located:
~/extpkgs
Install source for Hercules
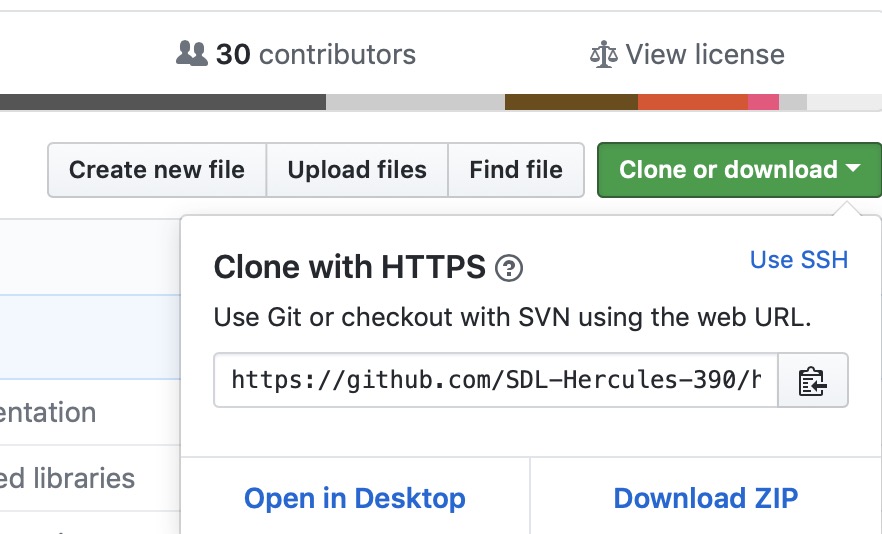
Next we are going to download (in git terms we ‘clone’) our version of Hercules. I recommend using the one from this Github user: SDL-Hercules-390. Go to his page, then click on the ‘Hyperion’ link. Once there, you will see a green ‘Clone or download’ button. Click on it and you will see this pop-up screen open.
Now you click on the small symbol next to the URL. This will copy the URL into your buffer to be pasted. Now we go to our terminal window we type:
cd ~/sdl42
git clone https://github.com/SDL-Hercules-390/hyperion
Mind you, the URL I got, might be outdated at the time you try this recipe! Paste in your own after the ‘git clone ‘ command. Execute the command and have it install all files you need.
Make sure we have all packages we need
To make sure our tool box is up to date we type:
cd ~/sdl42/hyperion/util
./bldlvlck
This will tell us which tools we need to get or upgrade. It will look something like this:
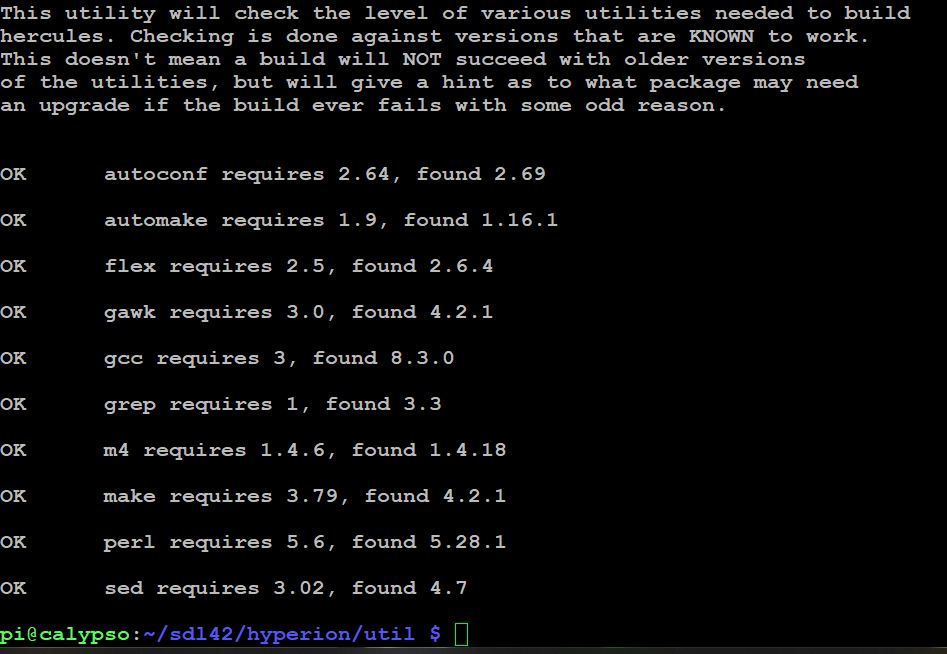
You carefully check which tools you need to get or upgrade and then you type:
sudo apt-get install ... autotools-dev cmake g++
This line above is an example! Fill in your packages on the dots! Important to notice is that ‘g++‘, ‘autotools-dev‘ and ‘cmake‘ are in the list of files to install. the bldlvlck utility will not warn you about g++, but install it, just like the others, the process needs it! We will come back here after we have done something else.
Building & installing Hercules
Now we can go back to our hyperion directory and build our version. First we do:
cd ~/sdl42/hyperion
./autogen.sh
And now, when the previous command went well, we are ready to configure our build; but watch it, you have to specify your own path name for the external packages, and mind you, if you are using a Raspberry Pi 2, use ‘cortex=a7’ instead of cortex-a8.
Building on a Pi?
In case you are building on a Raspberry Pi, some extra pramaters are needed, depending on your model (thanks to @Tahoeloj on Discord).
For the Pi 3 replace the ‘–enable-optimization’ with:
–enable-optimization=”-mcpu=cortex-a53 -mtune=arm8 -mfpu=neon-vfpv4 -frename-registers”
For the Pi 4 change to:
–enable-optimization=”-mcpu=cortex-a72 -mtune=arm8 -mfpu=neon-vfpv4 -frename-registers”
./configure --enable-optimization="-pipe -mcpu=cortex-a8 -mfpu=neon-vfpv4 -mfloat-abi=hard" --prefix=/home/pi/herc42 --enable-extpkgs=/home/pi/extpkgs
Build the binaries
After this command executed well, you can proceed to actually ‘make‘ the build:
make -j 4
This will take a while, especially on our Raspberry Pi… It will generate a lot of warnings, that is expected and can be ignored. When this make finished without errors we can do:
sudo make install
And we’re done building our own version. The binaries will install into /home/pi/herc42
Removing previous version
Now we need to take care of the old hercules version you might have installed from the repositories:
sudo apt-get remove hercules
This will (only) remove the hercules files that were installed by apt-get, so no worries, your build is save.
Before you start
Ok that’s it. Before you start Hercules, I’d recommend you shut down and reboot the Pi. This is in case Hercules hangs your Pi, you want to make sure that all of the changes from the build have been recorded to the file system. So let it record all of that first and start Herc after the boot.
How I start it:
My VM system is in a directory called ~/VM6PExt/6PExt, and there’s a hercules.cnf file there. So I wrote a shell script called ~/bin/vm6 to start it up that reads:
#!/bin/bash
#
#Go into VM directory
cd /home/pi/VM6PExt/6PExt
#
#Start hercules
sudo /home/pi/herc42/bin/hercules
Note on elevating Hercules with sudo. I choose to do this for my needs, but you probably don’t have to elevate. If you don’t want to elevate then you shouldn’t elevate on the make install either.