MQTT and Node-RED
Everyone with at least a minor interest in technical stuff has heard of IoT, the Internet of Things. In this IoT network it’s all about connectivity, about a network of physical devices, vehicles, and other items embedded with electronics, software, sensors, actuators, and network connectivity which enable these objects to collect and exchange data. Apart from the devices themselves, two things are needed, a method or protocol of exchanging information, and a way to tie things together; make information useful, initiating actions, etc.
In this autumn break I am diving into this IoT and see what we can do with it, using Raspberry Pi’s and perhaps Arduino’s.
Exchange information
 To be able to exchange information I will be using MQTT or “Message Queue Telemetry Transport”. It basically consists of clients that can publish messages and / or subscribe on them, and a broker (sort of a post office). You might recognise mqtt because I used it for communications in my elevator project.
Make things happen
 To be able to make things happen I will use Node-RED, a program that can tie things together, using a host of resources, amongst which the afore mentioned MQTT. It has been developed by IBM. It’s a program coded in Java that runs in a web browser and allows us to create ‘flows’ of information and actuate Things.
Progress so far
In my test setup I use three machines:
- Galileo – a Raspberry Pi 3B with wifi and bluetooth
- Columbus – a Raspberry Pi 2B with a wifi dongle
- Enterprise – my trusty MacBook laptop running the Safari browser
Home-automation
 For this test I was thinking about home-automation, so that determined the direction of my efforts and the names for the various functions, see the picture on the right.
This is a control panel that I created in Node-RED and that was populated by buttons in what is appropriately called “Dashboard” in Node-RED.
This is a very nice configurable way of creating a virtual dashboard in addition to physical buttons.
Network monitor
 Another possibility in Node-RED is to read all kinds of things from it’s environment, for example the time it takes to ‘ping’ another network node. For example, for my test I used npo.nl, cnn.com, google.com and amerikaanse-treinen.nl.
I created graphical representations of the ‘ping-times’ and displayed them on a second panel. See picture on the right.
Setup
On Galileo I installed:
- Node-RED
- The Mosquitto MQTT broker (the postoffice)
- a MQTT client that reads 4 switches and can switch 4 LED’s on and off through the RPi’s GPIO pins
On Columbus I installed:
- a MQTT client that reads 4 switches through the RPi’s GPIO’s
On Enterprise I:
- run Safari to develop the Node-RED flows
- run SSH to start or stop the RPi clients
The Galileo switches are used to control the lights (4 LED’s connected to the Galileo GPIO pins). The Columbus switches are used to generate (at this moment) 3 sounds.
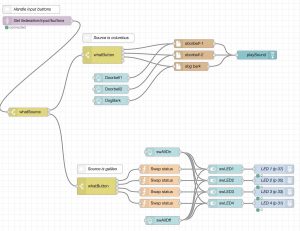
The Node-RED flows look as follows:
- Button Handling
- Gathering network data

